How to set up email in Outlook 2003
July 27, 2009 / Updated: July 27, 2009 / Lena Shore • Filed under: Email, Setting Up Email
This tutorial shows you how to set up Microsoft Outlook 2003 to work with your e-mail account. This tutorial focuses on setting up Microsoft Outlook 2003, but these settings are similar in other versions of Microsoft Outlook. You can set up previous versions of Microsoft Outlook by using the settings in this tutorial.
To Set Up Your E-mail Account in Microsoft Outlook
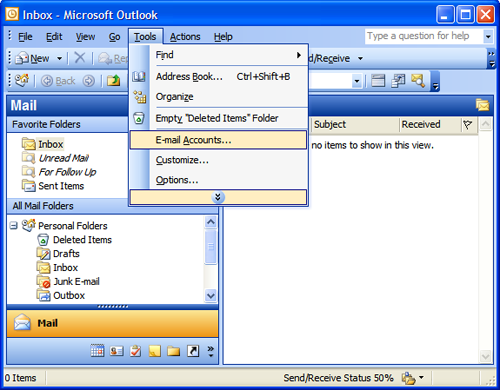
1. In Microsoft Outlook, from the E-mail Accounts menu, select Tools.

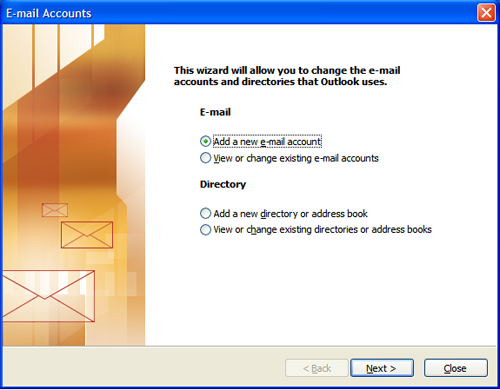
2. On the E-mail Accounts wizard window, select Add a new e-mail account, and then click Next.

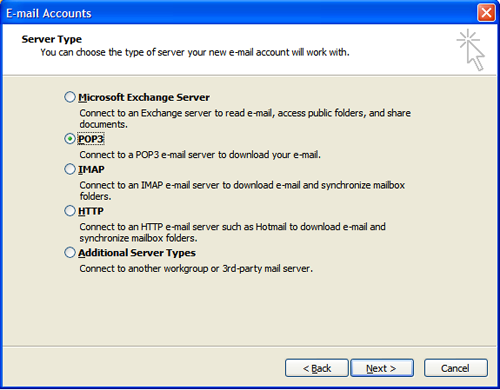
3. For your server type, select POP3, and then click Next.

4. On the Internet E-mail Settings (POP3/IMAP) window, enter your information as follows:
Your Name
Your first and last name.
E-mail Address
Your email address.
User Name
Your email address, again.
Password
Your email account password that has been provided to you.
Incoming mail server (POP3)
POP, Pop.yourdomainname.com. If your domain name is widgets.com, your pop would be pop.widgets.com. Replace “yourdomainname” with your actual domain name.
Outgoing mail server (SMTP)
Your SMTP works best if you use the one that has been provided to you by your Internet Service Provider.
Here are some common ones:
Comcast: smtp.comcast.net
Bellsouth: smtp.bellsouth.net
If yours isn’t one of the above, please go read “What is my SMPT” for a list of common smtps.
Click More Settings.

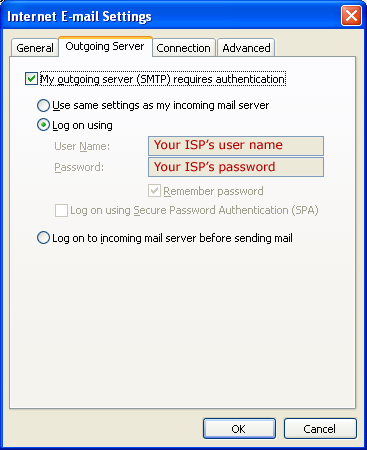
5. On the Internet E-mail Settings window, go to the Outgoing Server tab.
Your ISP (Comcast, Bellsouth, AT&T) may require you to have authentication. They really like for you to use their smtp and not the one associated with your custom domain name. You can try sending mail without it. If you get an error, you probably need to authenticate your SMTP.
Select My outgoing server (SMTP) requires authentication. The user name and password are the ones associated with your ISP account ([email protected] or [email protected]). This is not the user and password associated with a domain I set up for you.

6. Click OK.
7. Click Next.

8. Click Finish.

Nice post! This post is very helpful for AOL email users, who have some difficulties for the AOL email setting using IMAP. I get some helpful ideas from this blog. Thanks for sharing this post!
hey .. I go through your post it’s really very amazing and very simple, thank you for sharing this amazing blog, looking forward to more blogs. You can get more information “Bellsouth Email Settings for Outlook.
Hi Lena,
Sorry that the other person had such a bad attitude.
Question: I’m wanting to run (again) Outlook 2003 as my main source for organizing e-mails, calender . . etc. . . . . For the last 6-8 months I’ve switched back to using Bellsouth.net for organizing because I had a few computer crashes and lost mail that didn’t get backed up to a .pst.
In the meantime I now use Desktop as my main cpu and a netbook for going outside of the office.
Instead of having Outlook download all of the e-mail(s) from Bellsouth and me not having access with my netbook – is it possible to configure Outlook so that it will only pull a “copy” of the e-mail to Outlook and keep it up on their server so I’m able to access it with my netbook or a “public” computer. . . Just trying to cover all bases.
Thanks in advance for any help you can give.
Ed
Hi Ed!
Yes! This is an easy one. All you have to do is find the area of your settings that tell Outlook how long to leave items on the server. I believe the default is to delete them immediately. So, only have them delete after a week or two (whatever works for you). I do this sometimes when I travel and it works great. The only downside is you end up with copies of your email in two places.
An alternative is to see if your host supports imap connections (not pop). Then when you look at your inbox (from whatever device) you are actually looking at the server. You don’t actually download anything to your computer. When you send, you are sending from the server. It looks like everything is synced, but really you are working directly off the server.
Make sense?
(:
It’s this kind of grateful attitude that makes me really want to help and troubleshoot your issues.
Instructions sucked. Didn’t work!