How to purchase the right size stock photography for your designer
Updated: July 25, 2011 • By Lena Shore
Filed under: General

So, you’ve discovered the stock photography companies. You like the control of having your own account and purchasing your own photos. Picking out photos, sorting through hundreds of photos and finding just the right ones takes a lot of time and effort. The last thing you want to do is buy the wrong size for your designer. Buying the wrong size equates into wasted funds – you either bought more than you needed or not enough and have to repurchase.
After you’ve picked out your photos you’ll want to follow these guidelines to make sure you get what you need.
Make sure the image will work in the layout
- Is the photo the right proportion for your layout? Don’t purchase an image that is vertical when you need a horizontal one.
- Can you crop the photo to make it work? Maybe you need the entire photo, or maybe you just need a piece of it.
- If in doubt, talk to your designer.
Buy the right size
One of the most confusing aspects of image quality is how images looks on a computer monitor. Most people believe that if the image looks good on their computer it will work for a printed project. This couldn’t be further from the truth. I get a lot of images people snagged from the internet. 99% of the time they don’t work. An image would need to be too big to display on most monitors to look good in a printed piece. A printed project needs an image to be 300 dpi (dots per inch) at 100% to reproduce well. For something to look good on a computer monitor it only needs to be 72dpi. Every image you view on your computer monitor is being rendered at 72 dpi – and most of the time it looks great. But, take that same image that looks good on your screen and it will be fuzzy when printed.
- When you are ready to download and purchase a photo, check the 300dpi options.
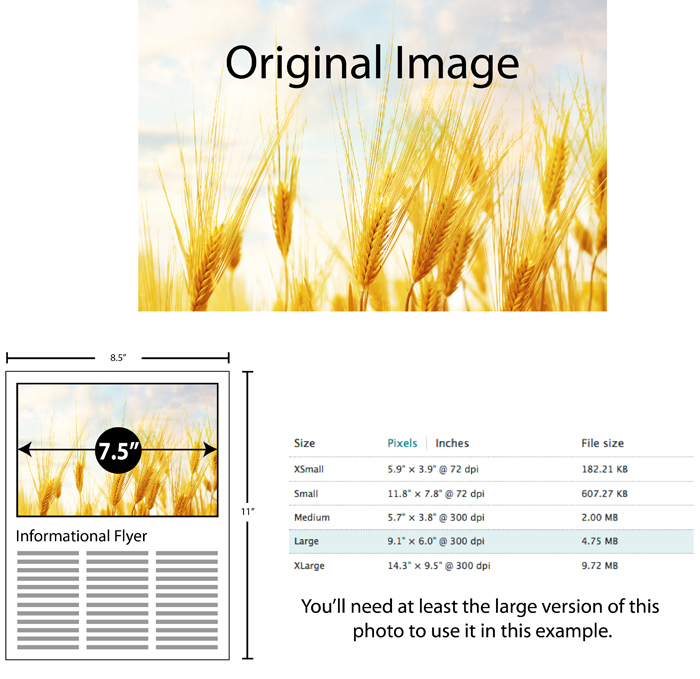
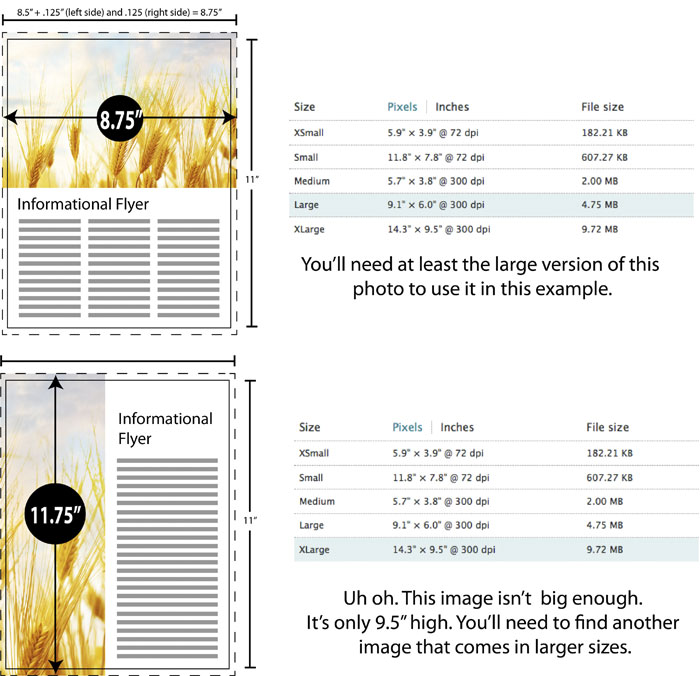
- Determine the size you need by examining the final product. If your final printed piece is a 8.5 x 11 flyer and your image is going to go all the way across then you need to pick an image that is at least 8.5 inches wide. If the image is going to span from the top to the bottom, then you need an image whose vertical size it at least 11 inches high.
- Account for bleed. If your image is going to bleed off the sides of that same flyer, you’ll need to add extra for bleed. Another .25 inches is a good rule. So, a flyer with bleed, that has an image that goes all the way across would need a photo that is at least 8.75 inches across.
- Account for any white space around the image. If you choose an image that is a woman sitting on a white background – the white background is going to be part of the image size. If you plan on cropping that image very close to the woman and half of the image is white space, you’ll need to purchase an image twice the width of the downloadable image.
- You can always pick and image that is bigger than you need, but you can’t pick one that is too small and enlarge it.
- Will you use the image for anything else? If you know you’ll be using an image for a business card now, but down the road you might be doing a poster – invest in the larger image. Otherwise you’ll have to purchase it again in the larger size. Remember, you can always reduce. You can’t enlarge.
- If you see a file that is an eps (vector) file and has no resolution choices, you are golden. Because of the way an eps file is produced it doesn’t have a resolution and can be used at any size — from a business card to a billboard.
Examples

