Create a Shared Family Address Book with Contacts and iCloud
Updated: December 16, 2021 • By Lena Shore
Filed under: Address Book, Macintosh, Productivity, Tutorials, iPad, iPhone

NOTE: “Apple Family Sharing” is good for sharing the in-app purchases, iTunes, iBooks, and iCloud storage. But, it doesn’t share address books well, at least not yet.
I’ve gotten a lot of questions about this lately. I figure Apple will solve this problem eventually by changing the way the address book works. But, for now, it’s not really meant for sharing between different people.
The sharing of the address book using the default Apple method (not my method below) is good:
- If you want to share and sync the entire address book with all members of your family.
- If you are okay with only one identity between machines.
If the above items won’t work for you, try the method below.
We are a two-person household. Each of us has iPhones, Macs, and iPads, so it makes sense that we would want to share the same Contacts/Address book. We tried having separate Contacts, but someone will update something and the other won’t have it — and it’s a hassle. So, then we tried just sharing the same Contacts with iCloud and it was worse:
- Your devices forget who you are
- Your iMessages starts using the wrong email
- Your icon is wrong
- Your iPhone doesn’t know where “home” is anymore.
- …and many many other irritating things that will make you pull your hair out.
The problem is that as soon as you share your Contacts (Address Book), your address book can only mark one person as “you”. This cascades down into all kinds of identity problems for your computer, iMessages, iPhones, and other devices. And, as far as I know, there is no therapy for electronics. So, one person in the household is happy and the everyone else is hella-irritated because their iPhone can’t tell them how to get home or why their messages are only coming to their computer and not on their other devices.
After a lot of trial and error, I figured out a great way to do it. It takes a bit to set up, but is very worthwhile.
Overview
- Single-Family-Member-iCloud-Account: Each family member has their own iCloud account ([email protected], [email protected], [email protected], etc.). This account will keep your identities straight. This Contact will have:
- All the family members who will be sharing the shared address book. (example: If you have 3 people in your family, you should have 3 contact cards.)
- No other addresses.
- NOTE: The one downside of this is that you won’t be syncing your single identities across the devices. So, if Billy moves out and his address changes, everyone will have to update that card manually on each device.
- Shared-Family-iCloud-Account: You will create a single shared family iCloud account ([email protected]). This account is the one that will be synced across all devices and can be updated by anyone. This Contacts will have:
- NO family members (that will be sharing this account)
- All addresses you want shared.
- Each device in your family will be connected to both the Single and Shared iCloud accounts. Combined you will have all your addresses.

Download a PDF version of the image above.
Step 1: Get prepared
This whole thing is going to go a lot easier if you have everyone’s computers, iPhones, iPads, etc. available so you can get it all done at once. It’s not necessary – but it will make it go faster and easier.
If your household is anything like mine – good luck trying to find an hour when someone isn’t using one of their devices. Maybe you can do it at 3 a.m.
Step 2: Create a new Apple ID just for your family address book
 You’ll need an email address for your new iCloud account – one you aren’t already using for any other Apple ID. I got a freebie one through gmail that I only intend on using for sharing my address book. But, you could get one through any other email provider.
- Name this email something that will indicate that it is the shared, address book one. Stick the word “family” or “shared” in it so it’s really clear what you are doing with it. You’ll be happy you did this later. Example: [email protected] or [email protected]
- Go to icloud.com and sign up for your Apple ID using the email address. You may need to log out of your current account.
Step 3: Back up your addresses
- Open your Contacts app
- Highlight all of your addresses
- Drag them to your desktop to make a single vCard.
- Rinse and repeat for each family member with their Contacts app.
NOTE: As a dear reader pointed out to me, if you use notes in your vCards, make sure they will export the notes with the rest of your vCards. Check this setting by going to Contacts –> Preferences –> vCard. You can change the default back when you are done.
Step 4: Combine all the addresses
Next, we are going to create a master Address Book with Contacts. Let’s assume you are going to do this on your own computer.
- Get all the vCards on your computer (email, Airdrop, imessage, thumb drive, etc.)
- Take all the vCards you created in step two and combine them into a single address book by dragging them onto the address book on your computer. FYI: If you are on YOUR computer, no need to drag the back up you just made back into your Contacts.
Step 5: Clean up your messy addresses
You don’t have do to this now, but it will be harder to clean up later with everyone syncing everything. It’s time well spent.
- Look for Duplicates (Contacts –> Card –> Look for Duplicates) and clean up as necessary.
- If your Contacts app is a real mess, check the App Store for apps to help clean it up. I have used “Contacts Cleaner” in the past and liked it.
- When you are done, create another backup of your newly cleaned up Contacts app the same way we did in Step 2.
Step 6: Import Addresses into Your New “Shared Family iCloud Account”

- Login to your new iCloud Account (Created in Step 2)
- Go to “Contacts”
- Look for the gear in the lower right
- Import the new shiny clean backup you made in the last step.
- Search for any family members that will be sharing this account and remove them from the Contacts.
Step 7: Prepare your Local Address book for Import
- On each device and computer, un-sync the contacts (ex. For iPhone = Settings -> Accounts -> iCloud) and delete all contacts, family members included. It’s sounds scary – but it’s okay. Remember step 5? You have a backup!
- In the Contacts app, confirm that all contacts are deleted.
- Make sure that all the family members’ contacts are in each individual iCloud accounts.
- In each individual iCloud accounts, highlight the owner’s card as “me”. Contacts –> Card –> Make This My Card
- On each device and computer, sync the contacts (ex. For iPhone = Settings -> Accounts -> iCloud).
- In the Contacts app, confirm that all family members’ contacts are listed and the owner’s contact is listed as “me”.
Step 8: Add New Account to computer
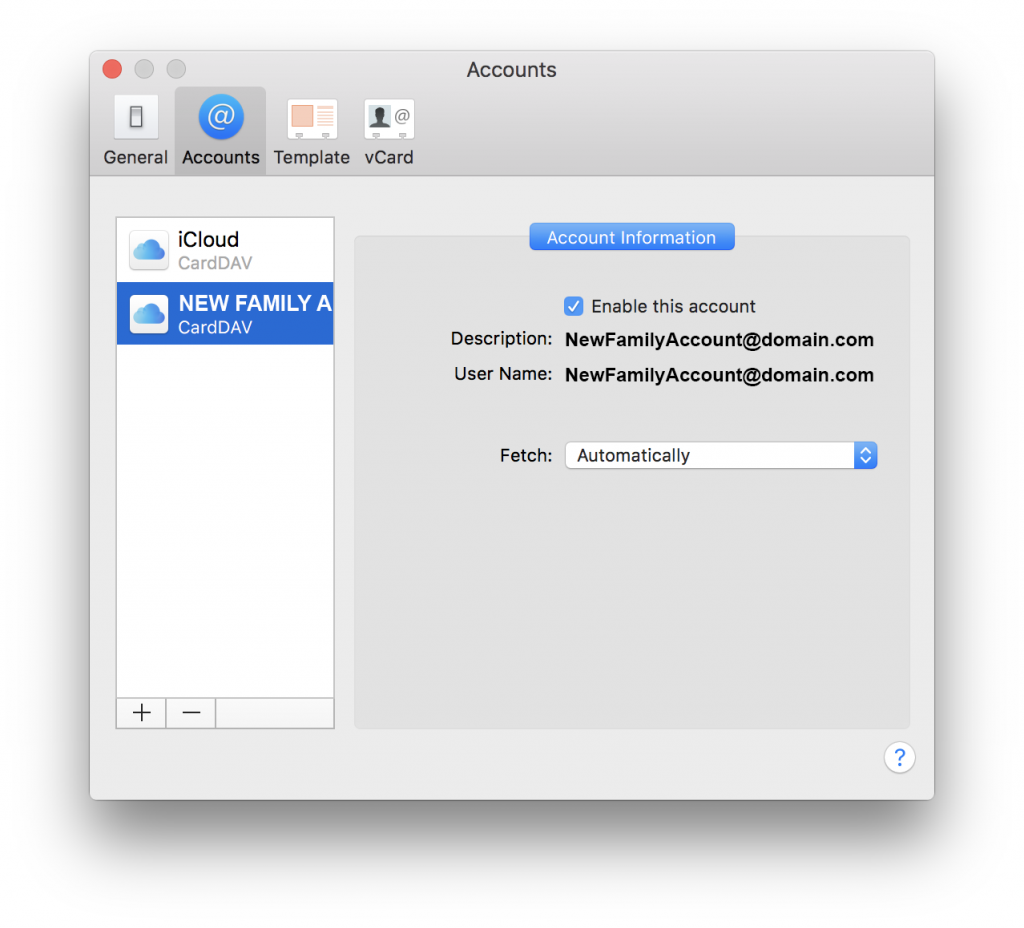
- While in Contacts go to: Contacts –> Preferences –> Accounts
- Click the “plus” symbol (+) and add your new “Shared Family iCloud Account”
- If you have been trying to share previous versions of your contacts before this tutorial (like I did) and you see remnants of them in the Accounts section, delete them.
- By now you’ll probably have to stop and reassure your family members that you are almost done and they can have their devices back soon.
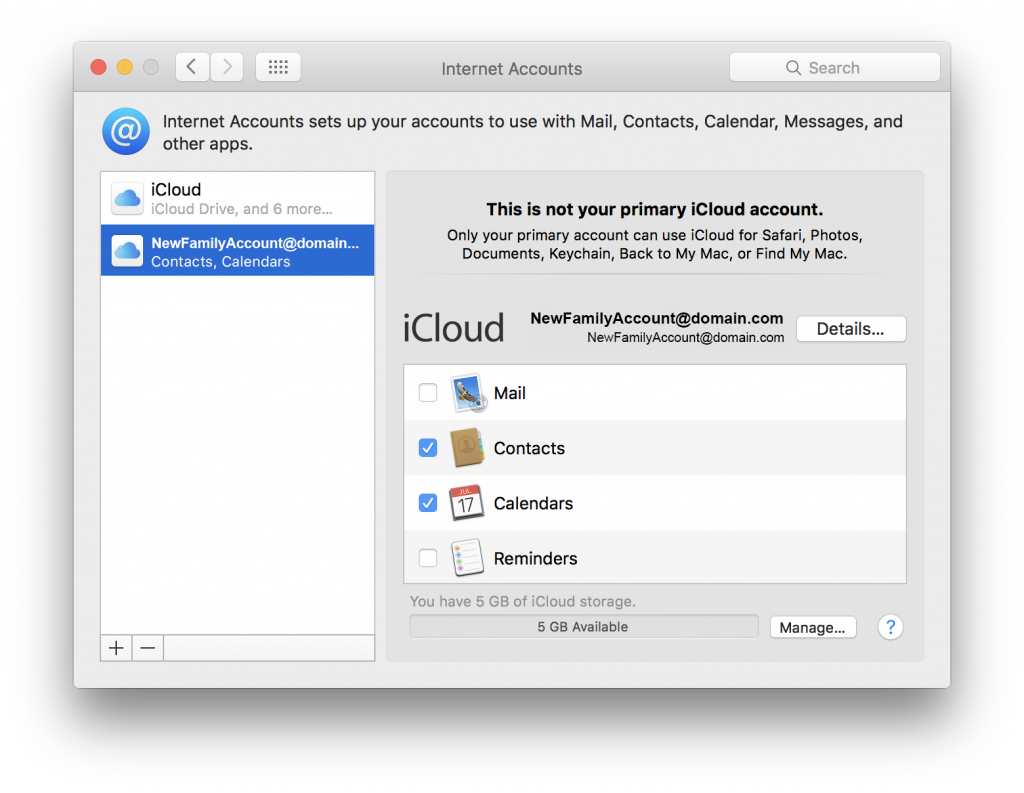
- Now go to Apple –> System Preferences –> Internet Accounts and make sure your new account is added there as well. If it isn’t, add it.
- Select the new account and make sure that only “Contacts” is checked. BONUS: you can also share a family calendar by checking the “Calendars” checkbox.
Step 9: Add New Account to iPhone and iPad
- Pick up your iPhone (or iPad) and go to: Settings –> Passwords & Accounts –> “Add Account”
- Add the new “Shared Family iCloud Account”
- As in the previous step — only activate the Contacts (and the Calendar if you want to share a calendar).
Step 10: Rinse and Repeat
- Now that you’ve done yours, you’ll need to do this on everyone else’s devices. I found it was easier to make a list of each person and their device so I didn’t forget anyone.
Step 11: Set Your Default Account (optional)
- Macintosh: Launch Contacts on your computer and go to it’s Preferences –> General –> (Select the Default Account desired)
- iOS devices (iPad, iPhone): Go to Settings –> Contacts –> Default Account

Final Notes
- If you decided to enable a shared Calendar for most things, make sure that everyone’s default Calendar is the new Shared Family Calendar
- You might also consider deleting other unused calendars. This is what we did as we were happy sharing everything on one calendar.
- If you have been trying to share before and it wasn’t working out, you may have remnants of old sharing attempts on your machine, iPhone, etc. Go ahead and delete those. You don’t need them and they can only cause problems in the future.
- If you don’t see your items updating on your phone immediately, you can check your Push/Pull settings; You can also add a blank entry to force your Contacts to sync.
Step 11: Go have a beer
- You deserve it!
Sorry, it will not work for me. Apple requires verification text and since my phone number is already associated with my iCloud account, it will not send me a verification text. Tried with wife’s phone number also. Same thing. Good idea if it would work. Apple just needs to fix it.
Lena, this is such a useful process and idea. Thank you so much for your effort in investigating and publishing it.
Just to confirm the outcome, will the accounts function to share (and display to each individual user) a collection of contacts common and updatable to all members of the “family account” and then a set that is exclusive to each individual user? If so, would you have to toggle between the two?
To put forward a practical example, I could share amongst the family group all of our relatives and doctors and neighbors etc., but I would retain my own college friends, business contacts etc. in “my own” address book?
Thanks if I have missed the obvious – you explained it quite clearly, I fear I may be missing something.
In the end (in my example), you are adding two accounts to your contacts:
Account 1: One that is just for you (you and your family members you are sharing with). If you update any of these cards, it will not sync with anyone else. This is where you’d add your contacts that don’t need to be shared.
Account 2: The address book that is shared between everyone. If you make a change to a card or they make a change to a card, everyone sees the updated card.
Now, if you ever want to get really complicated… you could add an Account 3, 4, 5, etc. to share/sync with groups of people (college, business, etc.). Or maybe a secret side family. LOL.
Hi Lena, thanks so much for sharing! I’ve been looking for a solution to share contacts with my team for years. I think I’m getting caught up around step 7.
1. When we save each other’s info to our personal iClouds, are we doing that directly in the contacts app on the phone before adding the shared iCloud account? Or are we doing that in iCloud on the computer, then syncing contacts from our personal iCloud in the iCloud settings on the phone?
2. How do determine where contacts are saved by default? I don’t see it as an option in contact settings. Since they are work phones, we want all contacts to save to the shared iCloud account by default, (linked through the “add account” step).
I’m so glad you found it helpful. I still use this technique and happy I do.
1. You can save it wherever you want (assuming you have your address book synced across devices).
2. You adjust the default on the desktop here: Contacts –> Settings –> General. On your iPhone it is here: Settings –> Contacts –> (Default Account).
When I double-checked, I saw that mine was not set up where it should be. Ha. Glad you asked! I think that sometimes when I’ve upgraded my phone or iOS it shifts. So, if you have problems, check your settings!
Thank you so much for this post. My partner and I share an iCloud address book and for months have had problems with our logon attributes changing for no apparent reason. Your advice about doing it all logically and with all the devices together was spot on! Thank You
Hi Lena,
I used your technique a couple years ago to merge contacts for my wife and me but unfortunately I’ve forgotten the password for the iCloud account with the shared contact list and things aren’t syncing. I’m planning on repeating the procedure but I am a bit confused about what contact cards are on the single (non-shared) contact lists. Does this list contain only the cards for the people who will be sharing the main contact list? For example, in our case would the single list for me and for my wife contain only my card and her card? Or could it have others, but those would not be shared?
And a second question: In steps 8 and 9 we add the shared contact list, but do we have to add the single non-shared account as well ? Thanks in advance.
Hi Randall!
The non-shared lists would have your card and anyone else you are sharing with. This way you can make your card “yours”. They will be doing the same thing, so if you want them in your contacts, you’ll need to keep them on the non-shared list. Of course, if you each have other contacts you don’t want to sync/share, you could add them to your non-shared lists as well.
Steps 8-9: You’d want to add your own non-shared account if you want it to sync with iCloud across your devices.
I’m having an odd difficulty with this setup. I got my 2 Macs to load the entire address book (620 entries) but the iOS phones & iPad Pro only load 301 of the entries. After a few hours of noodling around, I give up!
– For my primary iCloud accounts, should they be syncing Contacts? I assumed not but tried both ways.
– Some say that washing my big vcard file through Gmail (import, then export) before loading into the new family sync iCloud account supposedly assures latest vcard format (3.0) — is that right? Could my problem be card incompatibility? How would I know/fix it?
I am using two distinct primary iCloud accounts and then one family account for the Contacts sync under Settings-Contacts-Accounts.
Update:
Finally got it working, I think. Problem was two-fold – iCloud cannot work with vCards Version 2.1 anymore so they had to be converted to Version 3.0, and anecdotally it seemed that cards with “Company” designations would not pass to/from iCloud.
With those issues sorted, the instructions led to success! Thanks for your investment in them.
I’m glad you figured it out. Thanks for the information! I wouldn’t have known that about the cards.
Hi Lena, I’ve just discovered your article and have now sorted out a long standing problem – brilliant!! Had a few issues but got there in the end. Your clear and logical approach, especially the diagram, really helped understand what was being done (I love a diagram😅).
YAY! This process has certainly been tweaked over the years. I added the diagram a while back because it is a bit tough to explain. I’m so happy it helped you!
My AppleID is an iCloud account and I’ll be creating a new AppleID for my wife so we can share contacts while having separate AppleIDs.
Do you recommend that her AppleID be an iCloud account?
Yes. I do. But, you can create it with any email. (:
I’m about to try this for my wife and me. Currently, all contacts are in my individual account. My wife shares all contacts with me because both of our phones are on the same Apple ID, but I’m going to create an Apple ID for her.
Since we both share one common set of Contacts and will be adding an Apple ID, does that mean I don’t have to do steps 3-5, which seem to assume two different sets of Contacts?
I would still back everything up just in case. I’m a safety girl like that. But, yes you can skip those steps.
Thanks!
Does the vCard maintain all of the Contact groups?
Easy enough to test.
1. I made a fictitious card and a new group and added it. Then I dragged the vCard to my desktop and deleted the group and card from my Contacts. Then I added it back. No group was added with it. I suspect that a proper
2. I repeated the process but used the “export” feature. No group was added back.
I did see you can export by groups. So, that should make it easier. If this is an issue for you, you might search for 3rd party apps to do a different type of export/import. It also might be worth checking iCloud and see if it works any differently there.
Do you have any suggestions for how to move my contacts to the shared set of contacts and maintain the groups without having to manually rebuild them?
On my computer, I just drag and drop them to the other account. Now that will create two versions of them. So, you’ll need to delete from old account after you move them.
Hi Lena, I followed this a couple years ago and it worked great! Have you noticed problems on any of your devices in the last few days (since OIS 13.4?) around March 29 2020? One of my iPhones no longer can find my “Shared-iCloud-Account”. I can sign into the cloud and verify the account is still there with my contacts, but nothing synch to it anymore. Yikes! I’ve backed everything up – so maybe I’ll start over. I read a few posts online that said iPhones can now support only one cloud account. Any feedback welcome, and thanks again for this creative solution. I just hope it still works!
Hey Gary! I just added some things to my address book today and everything is working fine between my Mac and my iPhone. I haven’t looked at my iPad yet. My suggestions are (having done all these things):
1. Make sure you are adding your iCloud account (and not the associated “gmail.com’, or whatever, you used to create the iCloud account.)
2. Make sure you drill down to Settings –> Passwords & Accounts –> “Your shared account” –> Account to the “iCloud Account Information. I have seen it happen where it has a problem with the password and you can’t tell until you are on that page.
3. Log into iCloud.com and see if your address book has stuff in it.
4. Completely remove and re-add your “Shared Account”.
I know that we can have only one PRIMARY iCloud account, but you can have multiple secondary ones. I still have multiples and it’s working.
Let me know how it works out!
Thanks, I will try these. And thanks again for inventing this cool work-around. It worked great for 3 years, I’m sure I messed something up along the way 🙂
You are very welcome. I have to give research and the internet credit though… otherwise all those pieces wouldn’t have come together. I’m sure you’ll get it to work. Hopefully, it’s just on small thing that needs adjustment. One more tip that has helped me: if you can, put all your devices in one area so it’s easy to check each one’s setting methodically. It’s easy to skip one by accident. (:
Lean, thank you SO MUCH for this. My wife and I have a small business and we’ve been trying different contact sharing techniques over the years with varying amounts of success.This technique by far works the best.
But we have one problem…autofill in Safari. For some reason, when we try to use autofill to fill in our names & address on a web form in Safari, it uses the email account (me card) of the secondary account instead of of my primary one.
There are some more oddities…in Contacts, when I use Go to My Card, it goes to the email of the secondary email account. BUT…both my real card AND the secondary email account BOTH show the ME silhouette icon. And, if I go to my real card and select Make This My Card, nothing changes.
Any ideas?
Again, thanks so much.
Hi Ray!
– Try looking at your Autofill settings in Safari (Safari –> Preferences –> AutoFill). I can check the “Edit” next to “Using information from my contacts” and make adjustments.
– Check to make sure you only have your main email on your “My Card” and the secondary one on the other card. Don’t have duplicates. It feels like there might be duplicate info.
Hope that helps!
Hi, this seems like the solution to a decade-long problem, EXCEPT, since I log into Messages with my primary Apple ID account, iMessage no longer is able to attach names to any phone numbers in iMessage that aren’t in very tiny main-account Contacts. Is there a fix for this, do you know?
Hey Michael! I don’t have the problem you are having, so it must be some kind of setting somewhere. Here are solutions I’ve found (or mistakes I’ve made, LOL) to double-check:
1. Make sure you’ve restarted your computer since adjusting things.
2. Check your address book to make sure everyone is in there. You should have your primary Apple ID account (with just your information and families) and your shared account.
3. Make sure that under accounts you have each account and it’s syncing the contacts.
4. Check your syncing again.
5. Make sure each of your devices is also set up (computer, iPhone, iPad etc.)
6. Make sure your secondary account is using the apple credentials NOT the free account credentials. In other words, if you made a gmail.com email to use as your secondary Apple account – make sure you are logged in with the Apple credentials not the gmail credentials. In theory it shouldn’t matter – but I’ve had issues using the gmail.com directly.
7. Go to each account’s login page to make sure it doesn’t pop up with an error about credentials. I have had this happen multiple times. You can’t tell unless you go to the page where you password is located. Better yet, just do it over.
Pro tip: gather all the devices in one area to check all at once with a list of what you are doing and do each thing one by one.
Good luck!
Hi, I’ve been using this method for years. Thank you!
Recently I noticed that on each device that has added this shared iCloud account that user’s primary iCloud account’s avatar is being used as the avatar for the shared iCloud account (the shared account is inheriting the avatar of the Primary iCloud account) I realized there was no “Me” card for the shared iCloud account. If I were to add a “Me” card should it be in the shared account or in the “Primary” iCloud account of each user?
What I mean is there is no contact card with the iCloud address of the shared account and be extension no avatar associated with that contact card. Is it wise to create a card with that iCloud address, add an avatar, and keep it in the shared iCloud account?
John – What about logging into the shared iCloud and reviewing the profile information and changing the avatar? Where are you seeing the icon for this shared account?
Very interesting read… I have been doing this for years, with a Family account (for shared calendar and contacts), and individual accounts for everything else (notes, email, and iCloud drive). I have had a hell of a time getting around the “Me” issue – thanks for telling how…
One question I have, is how do we (a family of three) get to share iCloud Drive, is there a way? We already have a shared allocation of 200GB, I just would like to share the actual documents… I know how to share individual documents, but I’d like to share the entire iCloud drive, or at least folders…
Thanks in advance for any suggestions…
Only the main iCloud has Drive access. So, I don’t see a simple way to do this using iCloud and the shared address and eliminating the “me” issue. But, you could share a Dropbox or a Google Drive. I did also find this article that might help you: https://www.macrumors.com/how-to/share-files-stored-in-icloud-drive/
If I can make this work, I’ll be your slave for life. Seriously!
I”d like to create a new email address using @icloud.com. (If possible, I’d rather not create another gmail or yahoo account.) Is it true that I have to first create a new APPLE ID? I seem to remember it’s preferable not to have more than one or two Apple IDs,. but I will if that’s what it takes.
In my next life I’m going to try to understand why sharing an up-to-date address book within a family becomes a nearly insurmountable ordeal…
Thank you for offering hope of a solution!
Hey Joanna!
LOL. Well, let’s see if I can answer your questions.
If you have an extra @icloud.com account you can certainly use it. The confusing part is Apple stopped giving out [email protected] emails a few years ago. However, you can any email to create an iCloud account. So, what you need is an iCloud account – not specifically an @icloud.com email.
To be completely honest, I can’t remember WHY it didn’t seem to work with just an extra account (gmail, yahoo, etc.). I just remember when I figured this out, it worked with an iCloud account. It’s possible, it doesn’t matter now. If you are feeling brave, you could give it a try without creating a new Apple ID and see if it works for you. I’d love to know the results. I accidentally did a partial version of this with a gmail account and it did seem to sync – but I had problems. Maybe because I wasn’t consistent.
Having multiple Apple IDs is fine. Just keep up with what each one is used for.
My current theory on why Apple hasn’t implemented this themselves has to do with privacy issues. Otherwise, it seems like a no-brainer. (:
Hope that helps!
Lena
This is amazing! I’ve been struggling with this for years! Ready to dive in, but wanted to confirm one thing before doing so. I currently have plenty (read way too many) gmail email addresses. Can you help me understand if creating a new shared Apple ID (aside from shared iCal access) is required or if I could follow the same process and use a gmail account as the shared address account rather than a new apple account.
What might be the disadvantage to using google vs iCloud to host the shared contacts?
Just trying to avoid creating any unneeded new accounts!
Thank you so much!
Yeah, it gets weird, right? LOL.
You need an Apple ID account that you dedicate as a “shared” account to make this work. You can use an existing Apple iCloud account that you can dedicate for this or create a new one with any 3rd party email address.
To create an Apple ID you need an email. But, it doesn’t matter what email it is. I referenced gmail, but it could be any email address you weren’t using for your main (non-shared) iCloud account.
I had mine set up directly with gmail and it didn’t work right. I can’t quite remember what it was. It’s possible I just got a setting wrong. It might have been the “My Card” or double address entries. If I remember, I’ll post back. But, it won’t hurt you to try it. Just keep some notes and back up your addresses just in case! I’d love to hear what you come up with. Maybe I can simplify the process!
Thank you Lena, I’ve had the same problem for years and I couldn’t find any clever solution.
Your workaround works very well, even with my out-of-date iMac.
There’s just one thing you don’t mention : I had to restart each device to get the new sync to work.
It’s a shame Apple doesn’t provide a simpler solution for couples or families.
Big thanks from Versailles, France.
Thanks for the heads up on the restart. I don’t remember having to do that. But, I do have occasional issues with getting it to sync in general – so maybe that’s the trick!
Someone had a theory that Apple may have privacy issues with sharing address books since they are full of miscellaneous contacts. It’s possible we may never get a better solution from Apple, but it would be nice. (:
I am following along with the tutorial but am running into problems at step 6. I have merged the address book locally from 3 different Macs each running at least Yosemite 10.11.6 on my Macbook (Yosemite 10.11.6) and am trying to drag into iCloud under the desired shared userid when logged in through Safari. When I try to upload the contacts to a single account, I get an error that “Unable to import vCard – This vCard cannot be imported because it contains invalid contact data”. The “Learn More” button sends me to this link:
https://support.apple.com/en-us/HT202158
I’m not sure how they can be incompatible vCards when each came from a Mac address book! But leaving that aside, how can I find out WHICH vCards are incompatible, so I can remove them and perhaps modify to at least allow the import for the majority? None of the criteria in the URL above strikes me as obviously violated from the address book cards I have.
Thanks!
There are some address book cleaner apps in the App store you might try. I feel like I had this very problem a long time ago. I believe that one of the apps helped me out. When I found the mistake it was obvious – but I wouldn’t have spotted it in the sea of cards. Another option might be to merge outside of iCloud and see if you can sync. Good luck!
Me too. I logged into iCloud from Safari. Opened my contacts app on computer. Selected all letter “A’s” in my contacts, dragged them over to iCloud. Repeat for each letter (B, C, D etc). If there was an issue, the message would say how many vCards couldn’t be imported. Verify one by one what you just imported to se which one’s didn’t import. I had 4 total. I just created them individually in the iCloud account. The fewer you drag the easier it is to find the problem child.
Hope this helps someone.
15”MBP macOS 10.14.6
Thank you your my hero so much more detail the the Apple just click here to make it work. Which it doesn’t. This got us all colobrating dates and contacts. Sooo much better.
You are very welcome. Glad it helped! (:
Hello Lena,
Thank you very much for this, It seems like this feature is the Holy Grail of Contact management! i have been looking for a solution for over 18 years!
I have a small company, there are three of us and I want us all sharing same list of customers and have different email groups. This seems to be heading in right direction.
My question would be how to have each person to have own set of personal contacts that are not synced. If they have their own iCloud account, Can those contacts live there and not contaminate the shared contacts?
Thanks
I admit, I’ve found it really helpful for myself. (:
Each contact set up is two address books: Account 1 (yours) and Account 2 ( the one shared with everyone else). Anything on the shared account is, of course, shared. Anything on yours (Account 1) is not. So, anything you don’t want shared, put in your Account 1 contacts. Note: you can drag contacts to different accounts in Contacts – but this creates a copy. So, move first and then delete from the shared version.
I was able to use this method for a while, but now I no longer see the “Don’t Merge” option when I turn on my shared iCloud contacts account. So when I create my family members on my phone (with all iCloud contacts turned off) and then turn on the shared cloud contact account, the only option is “Merge” which then breaks the whole thing as the “me” card is synced between devices just like if we all signed into the same main Apple iCloud account. I’m not sure if this happened during a recent iOS update but losing the option to “Don’t Merge” seems a step backwards on Apple’s part. Obviously they’re trying to push everything onto iCloud so keeping contacts directly on your phone isn’t part of the plan any longer.
Thanks for the great website!
Huh. Well, at least you can manually removed the few family members after you add the shared account. I kept thinking that one day Apple is going to fix all this and we won’t need a workaround – but, recently someone hypothesized Apple might see sharing contacts between multiple people as a privacy issue. So, now I wonder.
Glad the article was helpful. (:
Somehow, I think I answered or found a way around my question left in the comment above.
But it has lead me to one additional question. While I am using the CONTACTS and CALENDARS from my new SharedFamily iCloud account, we populated the CONTACTS w exported .VCFs from our combined contacts. How are we populating the SharedFamily iCloud account CALENDAR?
Do I need to share/invite a iCloud member to share this calendar (the new SharedFamily iCloud account) from each of our personal iCloud accounts to populate the new SharedFamily iCloud CALENDAR ?
Also while I am using/selecting the CONTACTS and CALENDARS from my new SharedFamily iCloud account should I have the CONTACTS and CALENDARS checked/chosen/selected from our, my and my wife’s personal iCloud accounts?
Is there a benefit to doing this or is there a reason not to do this?
Sometimes you CAN is not the same as you SHOULD orSHALL do something.
Thanks again
Hey Stephen! I may have to do a video tutorial at some point on this. I know it gets complex.
Calendar – I wasn’t specifically giving a tutorial on a shared calendar – but you could certainly do it. I think the easiest way would be to have both calendars connected in your single iCal app and then edit each item to switch them to the shared account. Also, make sure the shared account is now your default calendar to add new events to. However, I know there are some import/export features and apps that might work well. But, I haven’t explored them.
Sharing the Calendar – Each person who wants to share the a calendar would add that account to their Calendar. So, from your computer, you’d check the “Calendar” box just like you checked the “Contacts” box under “Internet Accounts”.
I would say there are no benefits or problems with sharing the calendar. It just depends how you use it and if you’d like to see each others schedules or not.
Trying to understand your meaning is step 7
Step 7: Prepare your Local Address book for Import
• On each device and computer, un-sync the contacts (ex. For iPhone = Settings -> Accounts -> iCloud) and delete all contacts, family members included. It’s sounds scary – but it’s okay. Remember step 5? You have a backup!
• In the Contacts app, confirm that all contacts are deleted.
• Make sure that all the family members’ contacts are in each individual iCloud accounts.
• In each individual iCloud accounts, highlight the owner’s card as “me”. Contacts –> Card –> Make This My Card
• On each device and computer, sync the contacts (ex. For iPhone = Settings -> Accounts -> iCloud).
• In the Contacts app, confirm that all family members’ contacts are listed and the owner’s contact is listed as “me”.
•
Unsync the contacts? iPhone iOS ver 12.2
Settings->
-> Apple ID, iCloud, iTunes — I can go to “Name Phone Numbers, Email” (no contacts there)
iCloud and it =just shows what apps are using this iCloud
or
-> General — no contact info
or
-> Contacts -> My Info — this takes me to my contact list — Is this where I can select my contact as “ME”
-> Default Account — This allows me to select my account like “iCloud”
I follow your IDEA to clean out the contacts of all entries and can “delete” them all but Apple/MAC has a way of doing things and if I don’t do it “their way” it all goes awry.
Just to be semantically correct on my iPhone the “PHONE ICON” take me to the contacts and I assume you mean this when you say “contacts app”
So I am trying to understand and implement “un-sync the contacts”
I can go to my old(the one I am using)/personal iCloud.com, sign-in and delete all the contacts there. Will that do what you are trying to do?
Make sure that all the family members’ contacts are in each individual iCloud accounts.
This one is easy, I can just log into my iCloud, my wife’s iCloud and do this (I am just working on two to share)
In each individual iCloud accounts, highlight the owner’s card as “me”. Contacts –> Card –> Make This My Card
I can not follow this path. In my browser (chrome) there is no “contacts” link/selection available
On my MacBook I can go to the following: APPLE -> System Preferences -> iCloud -> Account Details -> Contacts
but this just sets my reachable “Apple ID” and iMessage
As I have said, I am just having a problem following you instructed “LINKS” map.
Am I just over thinking this, looking for an exact link map versus, you meaning maybe just “in this area” when you type: iPhone = Settings -> Accounts -> iCloud?
For iPhone = Settings -> Accounts -> iCloud I have no “Accounts” link/tab/selection available in my iPhone’s Settings tab.
Thanks for all your time and efforts on this front.
Thanks, this has been very helpful! On step 9, my iphone wanted to know if I wanted to merge my contact card on my phone with the icloud contact list I was adding in. I merged it, but was I supposed to do that?
So now I need to select cards for the “make this my card” step, and I need to use an address from the shared icloud contact list since I merged what was on my phone with the new shared list. When I do this, it changes all the devices to the card I select, so on my wifes phone, it has my info instead of hers for the “make this my card option”. How do I fix this? I dont see any options to add a contact card in on my phone that will not automatically be part of the new shared contact list.
Thanks again
1. Step 9: You can merge or not. Just know that whatever contacts you want to share should be on the shared account.
2. Your personal account (that should just include you and your wife) is the one you use to tell it “my card”. The shared account with everyone on it should NOT include you our your wife’s card.
(:
This is an awesome idea. I’ve been having an issue with this for a long time. Do you have to have two iCloud contact lists in use at the same time? Or, do you have to sign into your family iCloud account to call a friend, then your sign into your personal iCloud account to call your husband that you are sharing the contact list with? I am stuck somewhere in step 7.
Also, could you check step 11 – I’m not sure it’s correct for MacOS Mojave.
Can you please help? Thank you.
Glad you like the idea. It works really well. I’ve used it for several years now.
– You need two accounts. One account for yourself (your own dedicated iCloud account) plus another iCloud account everyone will share. You will have both connected at the same time. You won’t have to switch.
– I double-checked step 11 and it is correct. Are you looking at Contact’s preferences? Or maybe you accidentally looked at the computer’s preferences?
Thanks, Lena, for this guide. My wife and I shared an AppleID for years so that we could maintain a common address book. Then, just a few years ago, we started running into the identity problems you’ve described. A couple months ago I took the step of setting her up with her own AppleID, but I hadn’t thought to set up a separate shared AppleID. I’d thought that through Family Sharing we would still share a common address book, calendar, notes, etc. Unfortunately, that was not the case. Now she has contact changes that I don’t have and vice versa. I look forward to implementing the solution you’ve outlined, but I still have a problem. I can make a VCard backup of my contacts, because my AppleID is the one we use on our shared MacBook. However, I don’t see how to make a backup of her contacts, since they are no longer syncing with the MacBook. Can this be done right on the iPhone? Or do you have another recommendation?
Hey Mark!
Just ensure (or set up) your wife’s iCloud Account to backup the addresses to the cloud from her iPhone. Then login to icloud.com with that account. From there you can export all the contacts by going to the Contacts and then looking for the little gear icon in the lower left of the window. You’ll need to highlight all the contacts you want to export.
Alternately, you could get an app that will do this for your iPhone. I’ve only read about them and never used one. So, check the reviews!
(:
Hi Lena
Thanks for the article
I am struggling with step 9 – I cant seem to find —
Pick up your iPhone (or iPad) and go to: Settings –> Mail, Contacts, Calendars –> “Add Account”
Can you help?
David
Oops. It must have gotten renamed. I updated that step. Thanks for the catch!!
Lena,
I would this article to be very helpful. I have a question regarding Family Sharing.
My household is just me and my spouse, and we currently share an Apple ID, and we have encountered identity problems, especially with the Message app.
If we go to the scheme that you outlined above, I would set up an additional Apple ID for my wife, and an additional joint family ID. My question is: could I additionally set up Family Sharing? Which Apple ID would be the best choice for the head of family?
Hey Bob! Thanks for your interest.
You have the right idea. Add an apple ID for your wife and another for the joint one. You can still use Family Sharing and can pick whatever account you want for that. In our house, we made it the one that is associated with the person who takes care of the bulk of the bills. But, it doesn’t really matter. (:
Hi, this seems like the solution to a decade-long problem, EXCEPT, since I log into Messages with my primary Apple ID account, iMessage no longer is able to attach names to any phone numbers in iMessage that aren’t in very tiny main-account Contacts. Is there a fix for this, do you know?
This is so exciting. I’m so desperate to get my husband and me onto separate Apple IDs. Thank you so much. Still frustrated that we can’t continue to share a full photo library though. I know we can have a shared album through Family Sharing, but this doesn’t really help for the 25000 legacy photos which we have in our library and like to both be able to refer to.